Contents
- Introduction
- Image Classification Hierarchy
- Single Images
- Stereo Images
- Managing the Hierarchy
- Image Database
- Ranking Database Images
- Inserting Images to be Ranked
- Retrieving Ranked Images
- Software Download
- Closing Remarks
Introduction
The Image Classifier™ matches a hierarchy of source images against a set of target images. The target images are stored on the local file system. Links to a selection, or all, of these images are stored in the Image Classifier database. The Image Classifier uses the database to locate images that participate in classification. Images on the file system without database links are ignored.
The image hierarchy is comprised of folders that can store either folders or images. The purpose of the hierarchy is to group images which similar properties; for example, a species of plants can have multiple varieties, each variety contained in its own folder. Target image ranking is computationally expensive and is therefore triggered manually. The Image Classifier database maintains the rank score of images. If new target image links are added, or if new source images are added for classification, ranking will need to be computed for these before they can appear in any results. Once triggered, ranking is computed only for newly inserted source or target image, previously ranked images need not be scored again.
The ranking algorithm allows for flexibility of form when matching source and target images. For example, two trees, specimens of the same species and of the same age, won't have identical branching structure or leaf structure, nevertheless, we'd like them to match since they're semantically equivalent. This flexibility can also introduce false positives, where two semantically different images sharing similar structure, can also match.
Images captured for classification are stored in the hierarchy, in a folder that represents their grouping. Images can be single images or stereo images. Stereo images are comprised of two images, a left and a right, which are combined to form a 3D point model of the image. The advantage over simple images is that the 3D image can be rotated to view the source image at an angle. In either case, 3D or 2D, the source image background needs to be separated from the foreground to obtain the object of interest in the foreground. The background is rendered featureless, otherwise, it too will participate in image matching and rank scoring. The image classifier has services to separate and remove image backgrounds for both 2D and 2D images.
Once ranked, image retrieval is driven from the hierarchy, selecting one or multiple folders or images of interest. Selecting items higher in the hierarchy retrieves images matching any of the items below them. Retrieval can be slow, depending upon the the number of source images selected in the hierarchy, and the number of target image links in the database. Sorting is used to order the images on their ranking and relational database joins are used to combine the ranking results of multiple source images, in order to determine which images ranked highest for all selected source images combined.
Image Classification Hierarchy
The image classification hierarchy is user created and managed and defines the images that drive classification. A sample classification hierarchy is shown in Figure 1 and appears in the left window of the screen shot, under the title Image Hierarchy.
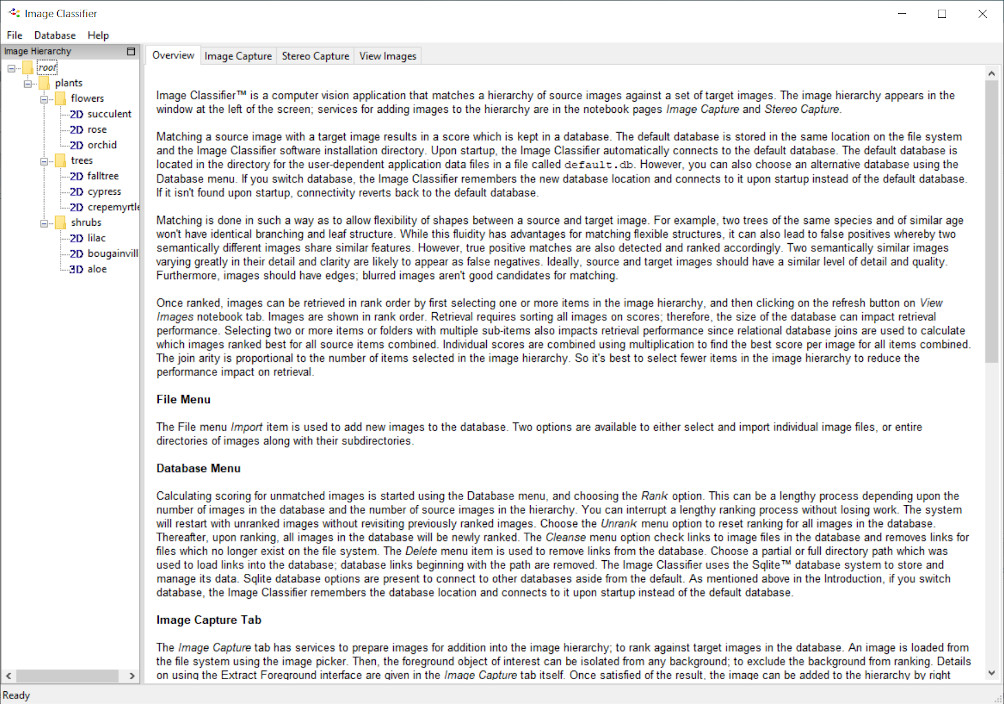
The window shows the root of the hierarchy at the top. Under the root is a single folder entitled Plants. Under Plants are three folders that specialize the types of plants of interest. 2D classification images are single image which were created under the Image Capture tab shown at the top of Figure 1 and which will be discussed shortly. The 3D Aloe image is a 3D point cloud created from stereo images using the Stereo Capture tab. The Stereo Capture tab will also be discussed in greater detail in the upcoming sections.
Single Images
Images used for classification are uploaded using the Image Capture tab. An example is shown in Figure 2.
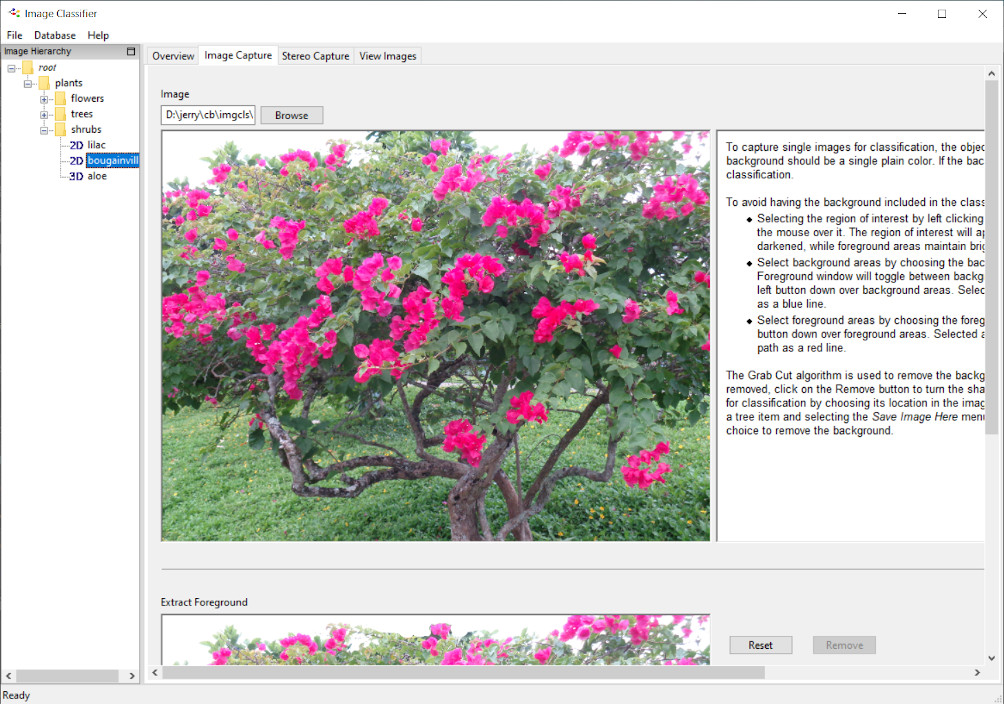
The location of single images on the file system is specified using the browse button, and appear as a file path in the text entry window preceding the browse button. Image file types that are currently supported include bmp, jpg, tif, png. Once a valid file path entered, the corresponding image appears in the view under the browse button, as shown in Figure 2.
In order to distinguish between the object of interest in the foreground and the remaining background, we offer the Cut and Grab algorithm to remove any background from the image. If left in place, the background also participates in image matching for classification, which may or may not be intended.
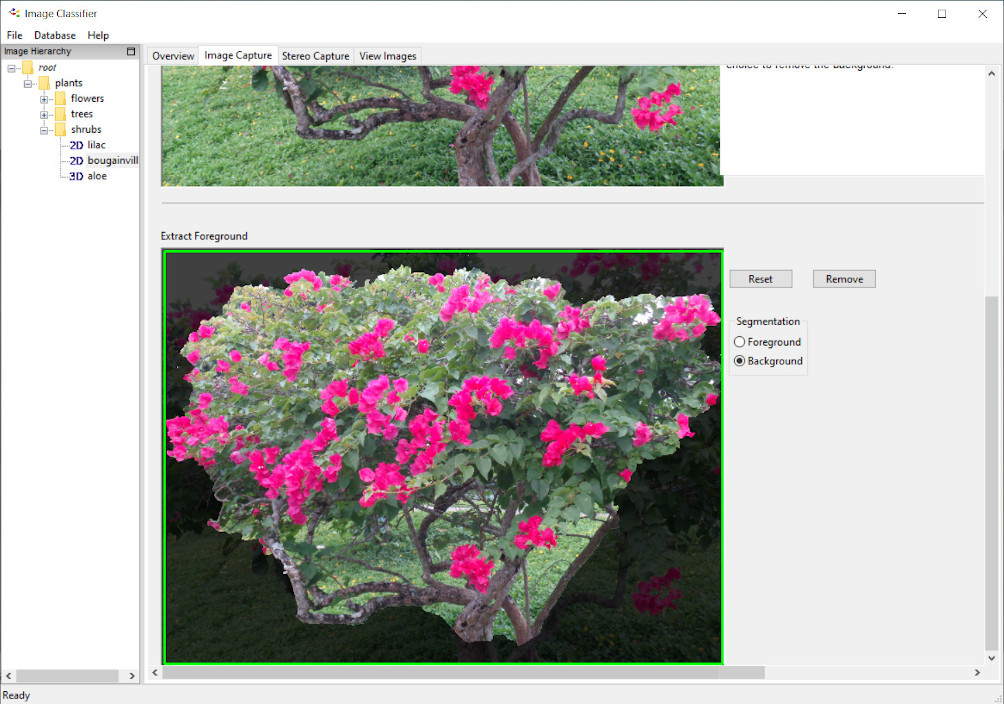
The image is replicated in the Extract Foreground view at the bottom of the screen, as shown in the sample in Figure 3. First, a square containing the foreground object is drawn by the user by dragging the mouse diagonally over it. A green rectangle is formed over the area, as shown in the figure. The Cut and Grab algorithm attempts to find the foreground based upon this initial selection. If the select is incorrectly drawn, it can be reset using the Reset button which causes the image to revert back to its initial state, and another green rectangle area can again be attempted.
Thereafter, iterative attempts are made to refine the foreground area. Select the radio button Segmentation to identify which area will be refined, either the foreground or the background. Then, draw a line over the area using the mouse. Foreground areas appear normally lit, background areas are darkened.
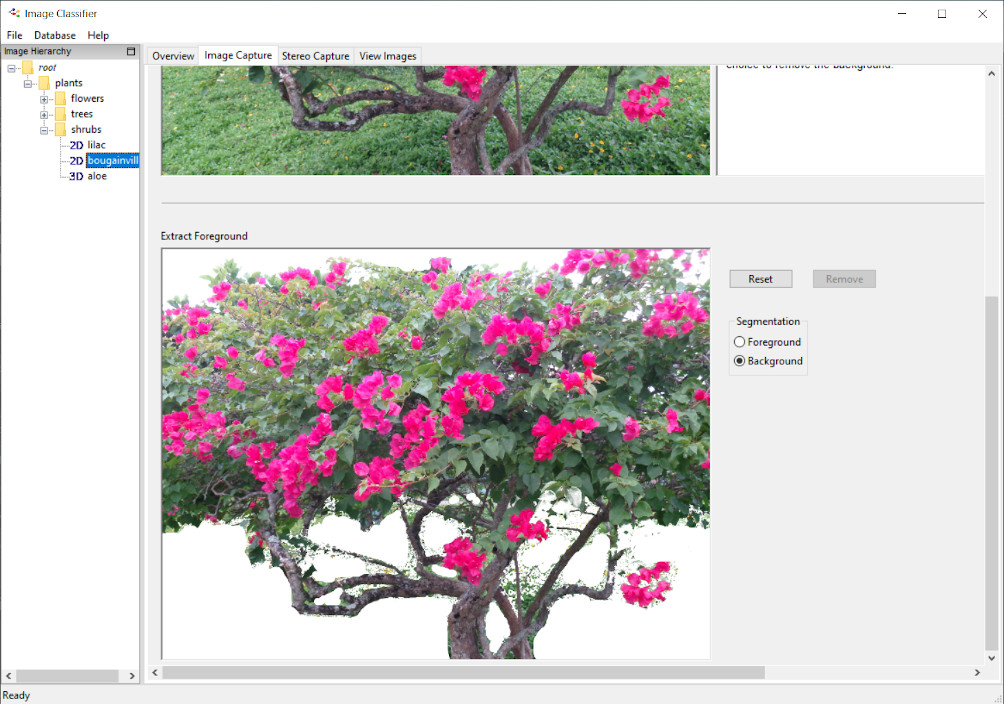
Once satisfied that the foreground and background have been correctly marked, click on the Remove button to erase the background. The background then appears in plain white, as shown in Figure 4.
Thereafter, right click on an empty item in the image hierarchy (i.e., one which doesn't have a 2D or 3D icon preceding it), and choose the menu item Save image here to store the image at that location in the hierarchy. If no empty items exist, a new one can be created in the hierarchy, or alternatively, the image associated with an existing item an be deleted to make place for the new image.
Stereo Images
Stereo image capture accepts two images, a left and a right, to create a point cloud in 3D space from the two images. An example of a stereo image capture is shown in Figure 5. Both image are of the same subject, but one image is taken at a slightly different angle than the other.
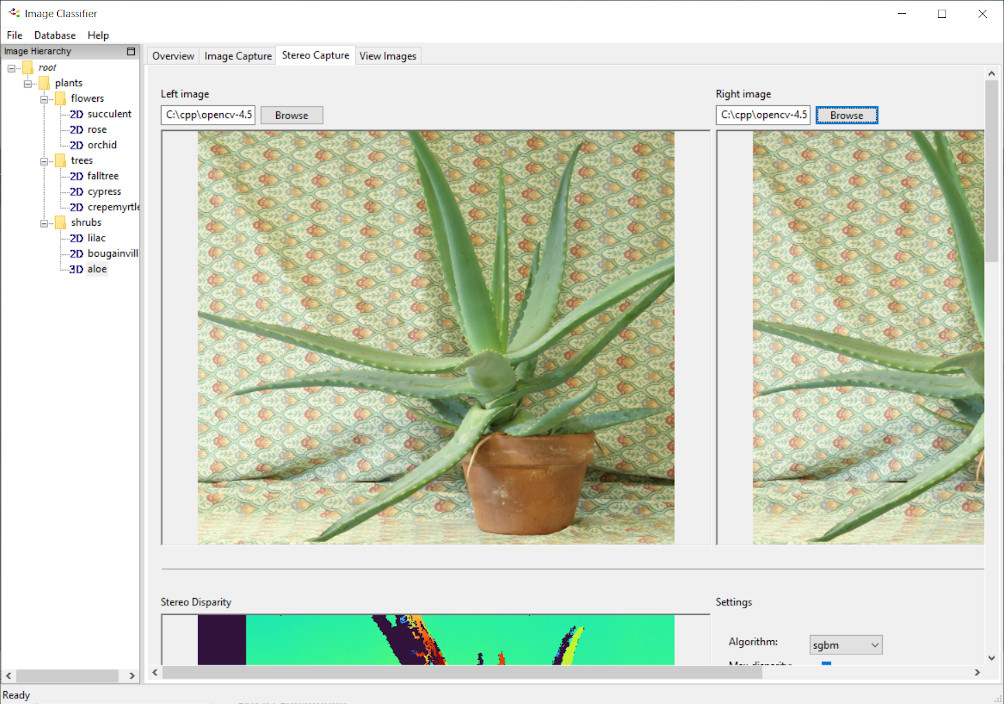
After both left and right images have been loaded, the classifier displays the stereo disparity and the 3D point cloud generated from the images. The view in the window showing the 3D point cloud can be rotated by clicking and dragging over the window. An example of stereo disparity created from two image is shown in Figure 6 and an example of its 3D point cloud is shown in Figure 7.
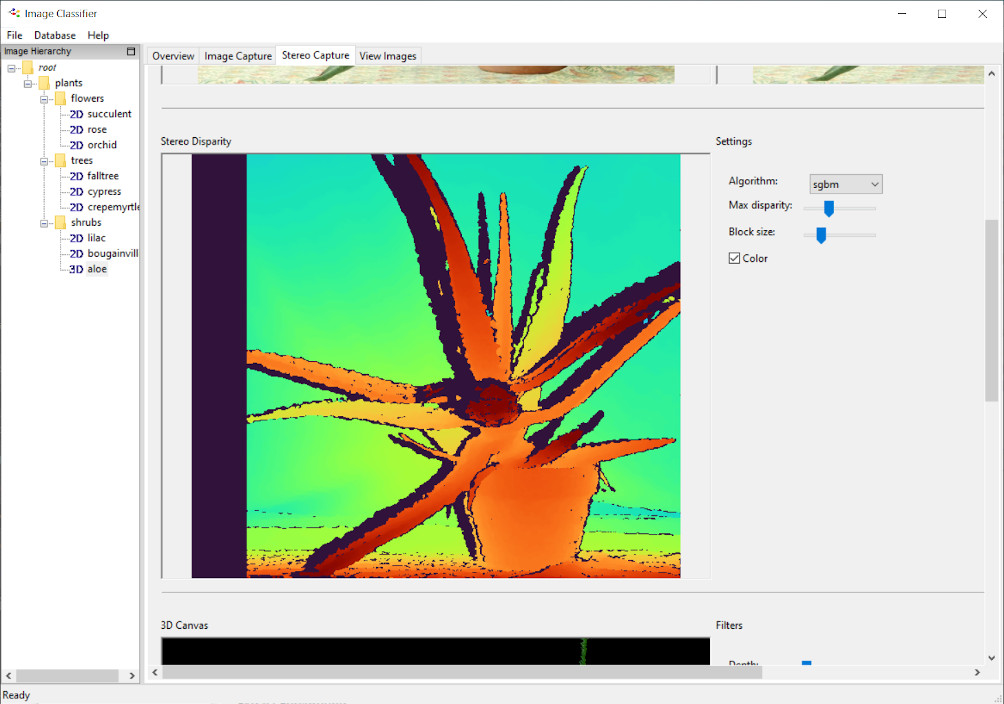
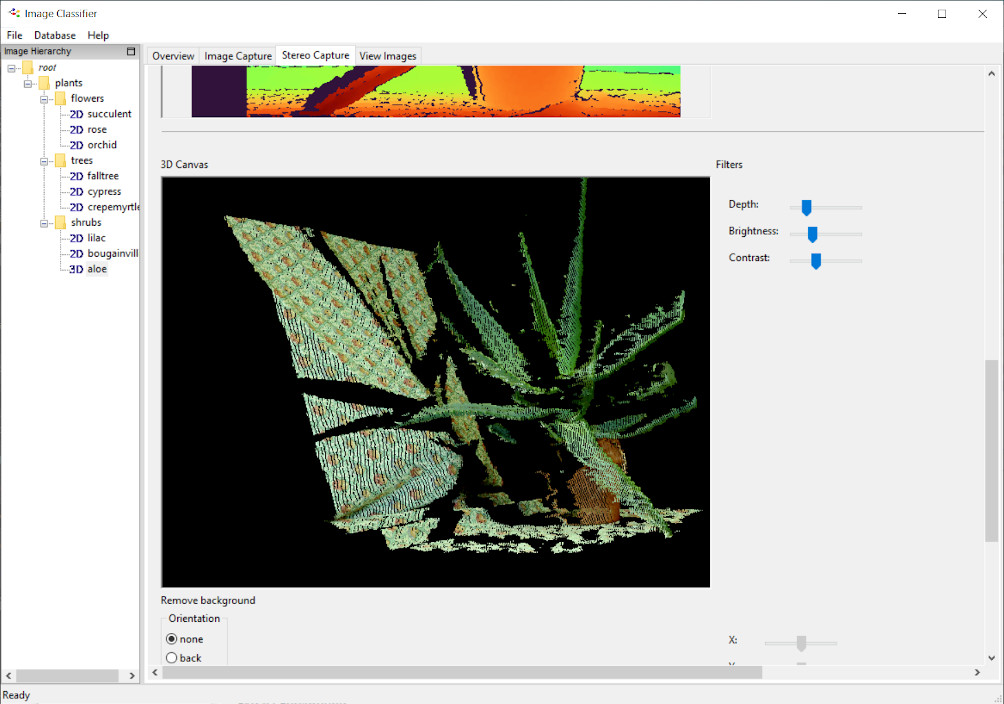
The quality of the rendering can be improved by choosing among several disparity algorithms, and setting parameters such as max disparity and block size. Modify the settings until the best outcome is found. Rotate the 3D point cloud to ensure that it is improved from all angles.
Filters control depth, brightness, and contrast.
The final step is to remove any background around the object of interest. If not removed, any background of the image is also be used by the ranking algorithm. Click on the Orientation radio button and select, for example, back to eliminate any cloud points that appear behind the object of interest. A white rectangle appears at the back of the image. Move the rectangle forward by modifying the Z slider, other directions are X and Y. Any points behind the rectangle are erased. The rectangle can be tilted using the tiltX and tiltY sliders to accommodate the orientation of the background points. Any background points that appear below, over, left, and right of the object of interest can be removed similarly using the corresponding Orientation radio button option. An example of the result of 3D background removal is shown in Figure 8.
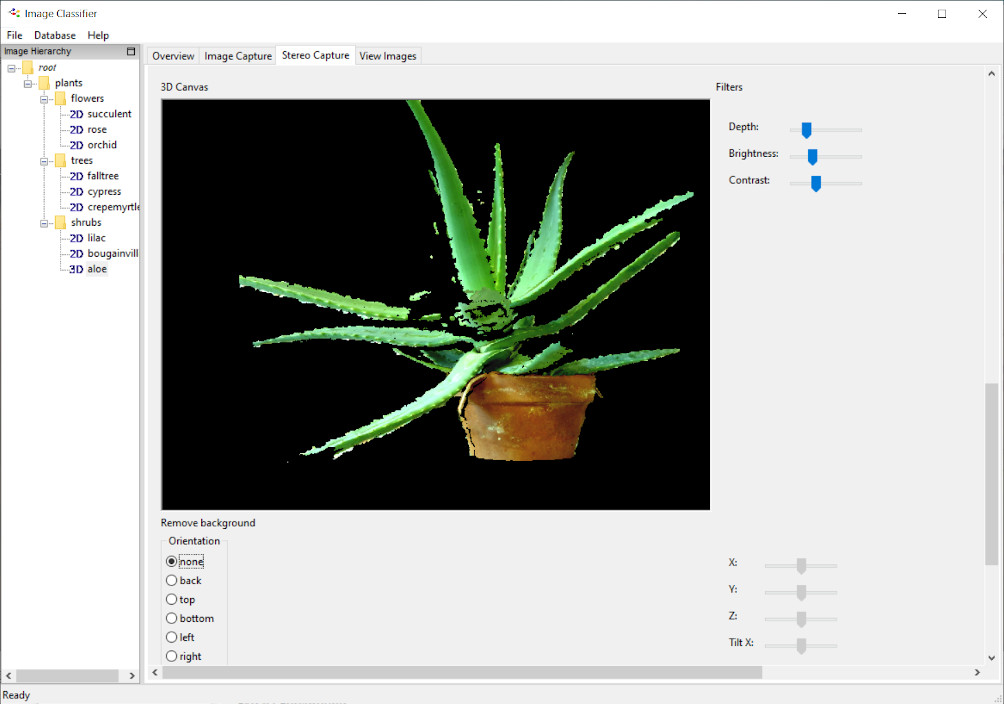
Once satisfied that the background has been removed from 3D cloud and only the object of interest remains, select an item in the image hierarchy to store the 3D cloud. Open the hierarchy finding the leaves. Find an item with no image, right click, and choose the Save Point Cloud Here menu option. Alternatively, right click on a folder and choose the New Item menu option to create a new empty item to save the 3D point cloud.
Managing the Hierarchy
The classification hierarchy appears in the leftmost view of the Image Classifier under the header Image Hierarchy, as shown in Figures 9 and 10 below. The hierarchy is a tree which contains folders and item that can either be simple 2D images or 3D point clouds. Items are prefixed with either 2D or 3D to indicate their type. Folders contain either items or other folders. In Figures 9 and 10, the flowers folder contains 2D images. Flowers itself is contained in another folder called plants which appears under the root folder. A folder or item name can be changed by double clicking on the folder or item, and entering a new name for it in the text area.
Items and folder in the hierarchy can be moved around simply by selecting and dragging the folder or item to a new location in the hierarchy.
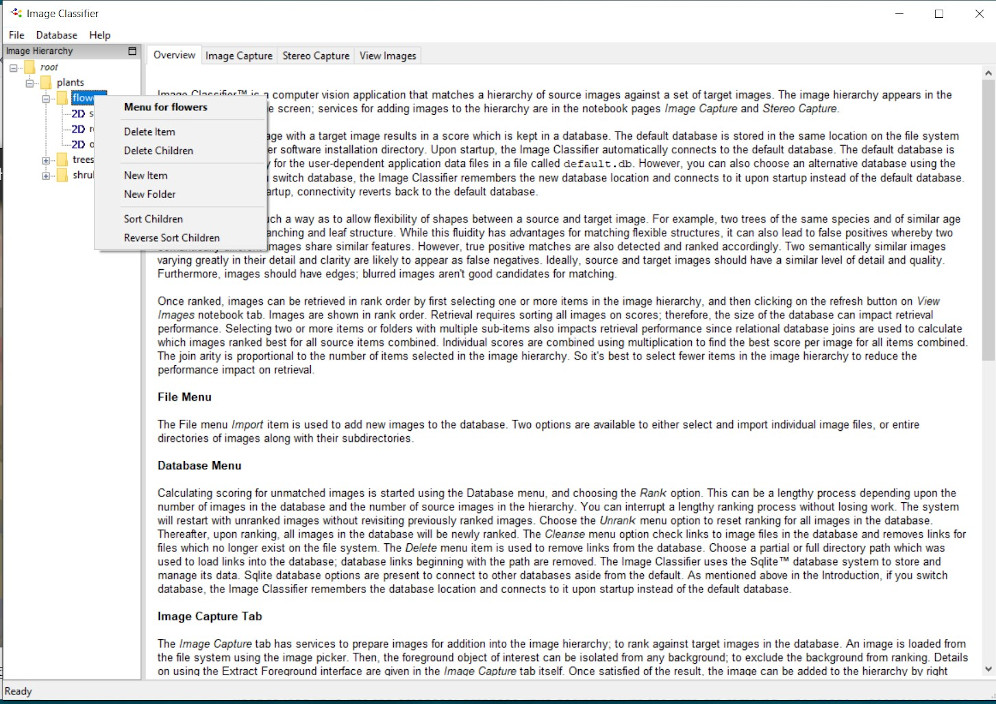
Figure 9 shows the menu options that are available by right clicking on a folder. Delete Item deletes the folder along with its contents. Delete Contents deletes the folder's contents but leaves the folder intact. New Item creates an empty item below the folder in the hierarchy, and New Folder creates a new folder below the folder. The last two options sort the contents of the folder.
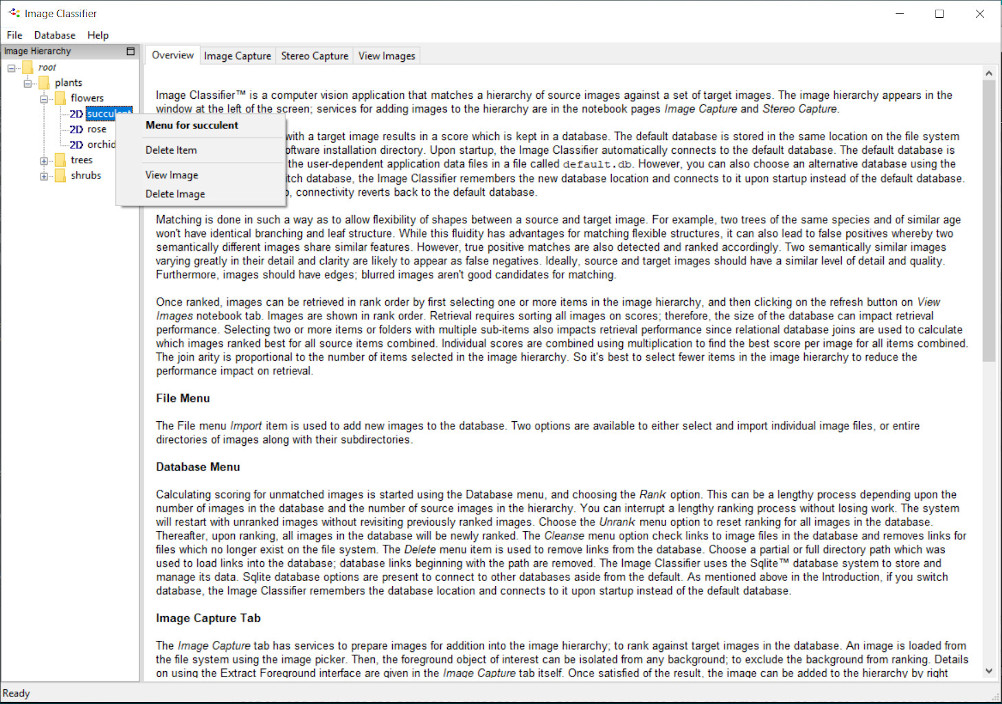
Figure 10 shows menu options that are available by right clicking on an item. Delete Item removes the item from the hierarchy. For 2D items View Image displays the image in the Image Capture tab. For 3D point clouds View Point Csloud displays the point cloud in the Stereo Capture tab. Delete Image removed the image associated with the item, and Delete Point Cloud does the same for point clouds.
Image Database
Matching a source image with a target image results in a score which is kept in a database. The Image Classifier uses the Sqlite™ database system to store and manage its data. Upon startup, the Image Classifier automatically connects to the default database. The default database is located in the directory for the user-dependent application data files in a file called default.db. However, you can also choose an alternative database using the Database menu. If you switch database, the Image Classifier remembers the new database location and connects to it upon startup instead of the default database. If it isn't found upon startup, connectivity reverts back to the default database.
Ranking Database Images
Scoring for unmatched images is started using the Database menu, and choosing the Rank option. This can be a lengthy process depending upon the number of images in the database and the number of source images in the hierarchy. You can interrupt a lengthy ranking process without losing work. The system will restart with unranked images without revisiting previously ranked images. Choose the Unrank menu option to reset ranking for all images in the database. Thereafter, upon ranking, all images in the database will be newly ranked. The Cleanse menu option check links to image files in the database and removes links for files which no longer exist on the file system. The Delete menu item is used to remove links from the database. Choose a partial or full directory path which was used to load links into the database; database links beginning with the path are removed.
Inserting Images to be Ranked
The File menu Import item is used to add new images to the database. Two options are available to either select and import individual image files, or entire directories of images along with their subdirectories.
Retrieving Ranked Images
The View Images tab retrieves ranked images. Images must first have been ranked in order to be retrieved. See the Database Menu above on how to rank images. First choose the folders or items in the tree hierarchy for which similar images are to be retrieved. Then, click on the refresh button to start image retrieval. If a single item is selected, results are ranked by similarity to it; if multiple items are selected, results are ranked by similarity to all through multiplication of combined scores. The complexity of the retrieval is proportional to the number of items selected in the tree hierarchy; either directly or indirectly contained in selected folders. Double click on any image in the list to view a larger version of the image.
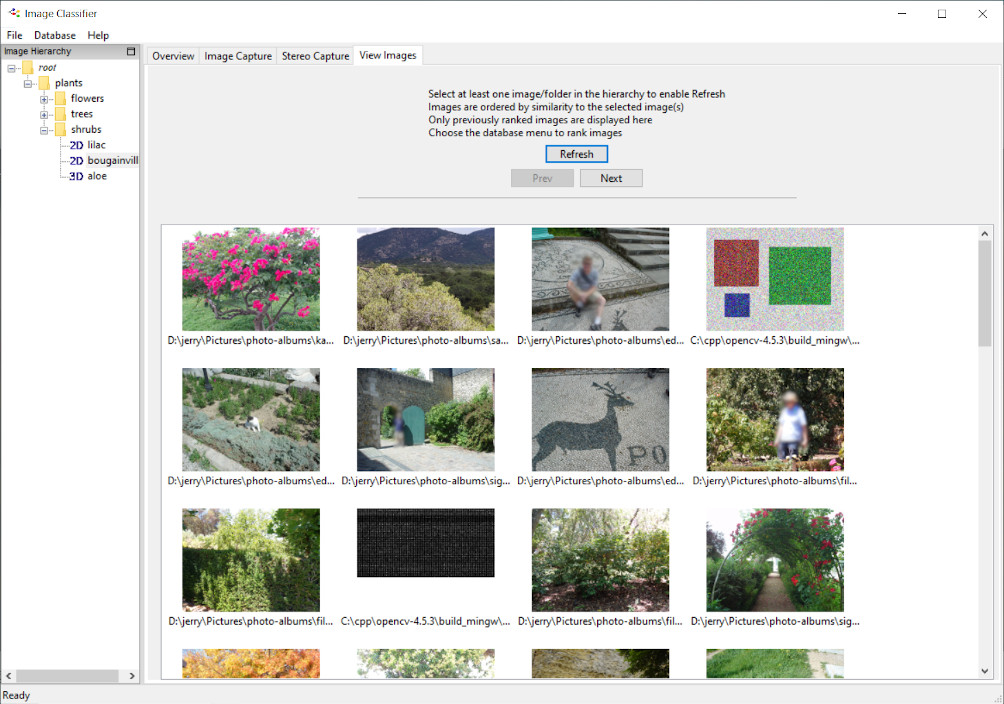
Figure 11 displays the result of fetching ranked images. First, at least one item is selected in the hierarchy; Bougainvillea is selected in the figure. Image are retrieved in rank order of similarity to the selected item by clicking on the Refresh button. The prev, next buttons are used to iterate over the results.
Software Download
We request that you contact us to obtain a user login which is required in order to access the download link. The Image Classifier is presently a Limited Availability Beta. It's only available for 64 bit versions of Windows 11™. We are interested in clients from diverse sectors, academia, and welcome feedback regarding features and function.
Closing Remarks
We hope that the Image Classifier will provide useful services for a broad range of applications, and that users will find use for it in new and unexpected ways. We expect that subsequent versions will be able to manage larger and larger data sets efficiently.
